Junk email, also known as spam, can clutter your inbox and pose security risks. Fortunately, Microsoft Outlook provides various tools to help you manage these unwanted messages. We’re going to explore the options available when you right-click an email in the Junk folder and hover over the “Junk” option. We’ll go through each option and explain how it can assist you in handling junk email effectively!
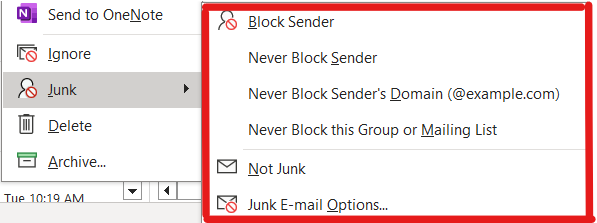
When you right-click on an email in the Junk folder, you will see these options:

Here’s what they mean:
Block Sender – Choosing “Block Sender” adds the sender’s email address or domain to your Blocked Senders list. This action will ensure that future emails from this sender go directly to the Junk Email folder.
Never Block Sender – On the flip side, “Never Block Sender” designates the sender as a trusted source. Emails from this sender will not be flagged as junk in the future.
Never Block Sender’s Domain (@example.com) – This option blocks all emails from the sender’s domain, such as john@example.com or jane@example.com. It is a handy feature if you want to block emails from a specific organization or domain.
Never Block this Group or Mailing List – If you belong to mailing or distribution lists, choosing this option will add the senders to your Safe Recipients list.
Not Junk – Marking an email as “Not Junk” tells Outlook that the email is not spam, and it should be moved to your Inbox or another designated folder.
Junk Email Options – This option opens a submenu where you can access additional settings related to junk email and spam filtering.
By using these options wisely, you can streamline your email management process and ensure that important emails reach your Inbox while unwanted messages are kept at bay. To strengthen your organization’s cybersecurity efforts, reach out to our experts at Opal Business Solutions.


